This product was successfully added to cart!
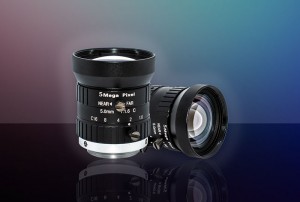
2/3″ Machine Vision Lenses
| Model | Sensor Format | Focal Length(mm) | FOV (H*V*D) | TTL(mm) | IR Filter | Aperture | Mount | Unit Price | ||
|---|---|---|---|---|---|---|---|---|---|---|
| MORE+LESS- | CH684A | 2/3" | 75 | 6.71º*5.04º*8.38° | / | / | F2.8-16 | C | Request Quote |
|
| MORE+LESS- | CH683A | 2/3" | 50 | 10.4º*8.4º*12.3° | / | / | F2.8-16 | C | Request Quote |
|
| MORE+LESS- | CH682A | 2/3" | 35 | 13.1º*9.9º*16.3° | / | / | F2.8-16 | C | Request Quote |
|
| MORE+LESS- | CH681A | 2/3" | 25 | 20.1º*15.3º*24.6° | / | / | F2.8-16 | C | Request Quote |
|
| MORE+LESS- | CH680A | 2/3" | 16 | 30.8º*23.1º*38.5° | / | / | F2.8-16 | C | Request Quote |
|
| MORE+LESS- | CH679A | 2/3" | 12 | 39.8º*30.4º*48.5° | / | / | F2.8-16 | C | Request Quote |
|
| MORE+LESS- | CH678A | 2/3" | 8 | 57.6º*44º*67.6° | / | / | F2.8-16 | C | Request Quote |
|
| MORE+LESS- | CH641B | 2/3" | 8 | 57.6º*44.9º*69.0° | / | / | F1.6-16 | C | $45Request Quote |
|
| MORE+LESS- | CH642B | 2/3" | 12 | 38.9º*29.6º | / | / | F1.4-16 | C | Request Quote |
|
| MORE+LESS- | CH643B | 2/3" | 16 | 29.9º*22.7º | / | / | F1.6-16 | C | Request Quote |
|
| MORE+LESS- | CH644B | 2/3" | 25 | 20.34º*15.78º | / | / | F1.4-16 | C | Request Quote |
|
| MORE+LESS- | CH645B | 2/3" | 35 | 13.14º*9.8º | / | / | F1.7-16 | C | Request Quote |
|
| MORE+LESS- | CH646B | 2/3" | 50 | 10.1º*7.5º | / | / | / | C | Request Quote |
|
| MORE+LESS- | CH677A | 2/3" | 6 | 73.3°*57.5° | / | / | F1.4-16 | C | Request Quote |
|
2/3″ machine vision lenses are a series of high resolution lens with C mount. They are designed for up to 2/3-inch sensor and provide angle view field with low distortion.
These machine vision lenses can be used to inspect semiconductors. In combination with other machine vision system components, they use deep ultraviolet wavelength light to inspect wafers and masks to achieve the needed high speed and resolution.
Metrology and inspection are important for the management of the semiconductor manufacturing process. There are 400 to 600 steps in the overall manufacturing process of semiconductor wafers, which are undertaken in the course of one to two months. If any defects occur early on in the process, all the subsequent processing does not make sense.
Detecting defects and specifying their locations (position coordination) are the primary role of inspection equipment. Machine vision lenses catch incorrect or bad parts before they are built into larger assemblies. The sooner that defective items can be detected and removed from a production process, the less waste in the process, which directly improve yield. Compared to manual methods of monitoring and inspection, automated machine vision systems with a high quality optical lens are faster, work tirelessly, and generate more consistent results.
-

Skype
-

Whatsapp
-

Top
- English
- French
- German
- Portuguese
- Spanish
- Russian
- Japanese
- Korean
- Arabic
- Irish
- Greek
- Turkish
- Italian
- Danish
- Romanian
- Indonesian
- Czech
- Afrikaans
- Swedish
- Polish
- Basque
- Catalan
- Esperanto
- Hindi
- Lao
- Albanian
- Amharic
- Armenian
- Azerbaijani
- Belarusian
- Bengali
- Bosnian
- Bulgarian
- Cebuano
- Chichewa
- Corsican
- Croatian
- Dutch
- Estonian
- Filipino
- Finnish
- Frisian
- Galician
- Georgian
- Gujarati
- Haitian
- Hausa
- Hawaiian
- Hebrew
- Hmong
- Hungarian
- Icelandic
- Igbo
- Javanese
- Kannada
- Kazakh
- Khmer
- Kurdish
- Kyrgyz
- Latin
- Latvian
- Lithuanian
- Luxembou..
- Macedonian
- Malagasy
- Malay
- Malayalam
- Maltese
- Maori
- Marathi
- Mongolian
- Burmese
- Nepali
- Norwegian
- Pashto
- Persian
- Punjabi
- Serbian
- Sesotho
- Sinhala
- Slovak
- Slovenian
- Somali
- Samoan
- Scots Gaelic
- Shona
- Sindhi
- Sundanese
- Swahili
- Tajik
- Tamil
- Telugu
- Thai
- Ukrainian
- Urdu
- Uzbek
- Vietnamese
- Welsh
- Xhosa
- Yiddish
- Yoruba
- Zulu
- Kinyarwanda
- Tatar
- Oriya
- Turkmen
- Uyghur


 Products


